Home » Posts tagged 'Sue Hodghton'
Tag Archives: Sue Hodghton

A Silken Seat
(to enlarge any of the pictures below, just click on them)
‘When a man says he’ll do something, he’ll do it – there’s no need to remind him every six months’

-The Madonna of the Yarnwinder by Leonardo da Vinci
It is almost exactly six months since a conversation on the Slow Bicycle Movement Facebook page with Susanna Ingram – Brompton owner, slow cyclist and celebrated mandolinista – reminded me both of the painting above* and the existence of yarn winders in general. We had been discussing Pedersen saddles and I had been explaining the particular difficulty which had prevented me for many months already from following through my plan to weave a new saddle for my Pedersen from a skein of crimson silk.
I had woven one already, pictured below:

My first attempt at weaving a Pedersen saddle
This was woven from some 50 yards of plain piping cord which I dyed a fetching shade of green; it was made on the improvised jig shown below, following the instructions of Sue Hodghton in the Dursley-Pederesen workbook, to whom I (and many others, I am sure) owe a debt of gratitude for her pioneering work in the field, nearly forty years ago:

The saddle, though not the prettiest piece of weaving, worked well enough, though I think the cord I chose was too thick – 3mm I f I recall aright; half that might have been better. But the main difficulty arose from the design of the cantle iron, which forms the rear part of the saddle; this, it must be said, is viciously bad:


It looks well enough, in a sinister way – a bit like the iron crown of Morgoth from the Silmarillion – complete with seven loops which might be stone settings but actually provide an attachment for the seven springs from which the rear of the saddle is suspended. There are two methods Sue Hodghton suggests for weaving: the one I chose starts with the tip of one of the horns and winds the cord around the cantle-iron until the first quarter of the ‘hook’ is covered, and you have reached the lowest point; then you run the cord up to the bobbin that secures the nose of the saddle, pass it round that, returning to the cantle to form the first pair of warp threads; you take a single turn about the cantle, then go back round the bobbin to form the next two warps and so on.
When you have come round level with the tip of the horn, you take two turns round the cantle before going round the bobbin at the nose, and continue thus till you come level with the other horn, where you revert to taking a single turn. All well and good, were it not for those infernal spring loops in between. When you reach the first of them, the problem becomes apparent: hitherto you will have been able to keep the bulk of your fifty yards of cord wrapped round some form of shuttle or spindle – I used a wooden rolling pin bought from Morrisons. Since there are no closed loops on the early part of the cantle – the horn tip has a gap that allows the cord to pass – you can unwind only as much cord as you need, pass that round the rod or the bobbin as required, and keep the rest wound round the rolling pin.
But when you reach the first spring loop you meet the problem. Four warp threads (i.e. two pairs) should run from each loop, with a double turn between each, meaning that the thread must pass through the loop at least six times – and because the loop is closed and is much too small to admit the passage of a wooden rolling pin, or indeed any kind of thread holder, that means that all the thread must be unwound and passed in its entirety through the loop, six times for each loop, a totally of 42 times in all (there are four warp threads with double turns between each loop, but they, being open, are not problematic). And if it is unwound for each pass through, it must be rewound in between, or a horrible tangle will result; so I bought a second rolling pin from Morrisons, and two knife-sharpening steels; I drilled a hole in the end of each pin, so that it could be mounted on the steel in the manner of a giant reel of thread on a spindle.
Had Mr Pedersen had the foresight (or the wisdom to consult the small army of women in and around Dursley who wove the saddles as a cottage industry) he might have adjusted his design to one using eyelets, say

or even simply turned the loops through 90 degrees, so that the cord could pass on either side without ever having to go through, thus obviating the difficulty; but alas, he did not.
A moment’s thought will tell you that winding some fifty yards of cord around a rolling pin is tedious enough to do only once, let alone on forty-two separate occasions, so you might wonder that, having successfully made one Pedersen saddle, I should ever want to make another unless I had to. When I say that the answer can be given in a single word, and that word is ‘silk,’ then there will be one set of readers who will shake their heads and look puzzled, another who will nod and smile ruefully.
Doubtless there are people who are impervious to the allure of silk, but I am not one; the very word is enough to beguile me.
(I am in good company: consider this sexy little poem by the great Seamus Heaney, from his collection Station Island:
La Toilette
The white towelling bathrobe
ungirdled, the hair still wet,
first coldness of the underbreast
like a ciborium in the palm.
Our bodies are the temples
of the Holy Ghost. Remember?
And the little, fitted, deep-slit drapes
on and off the holy vessels
regularly? And the chasuble
so deftly hoisted? But vest yourself
in the word you taught me
and the stuff I love: slub silk. )
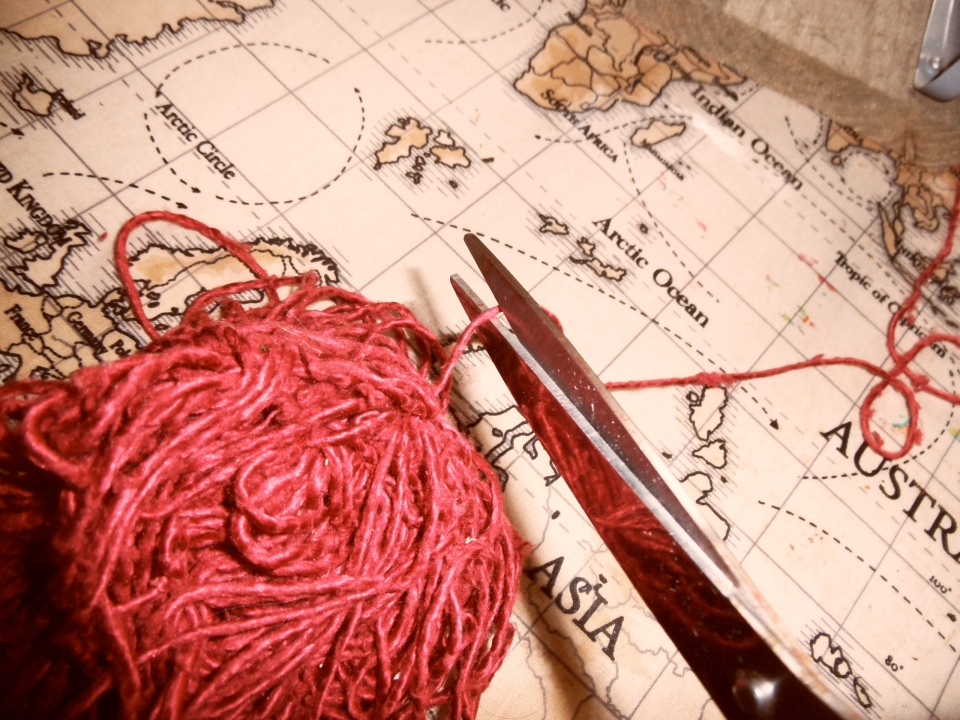
Whether Pedersen saddles were ever actually made from silk is a moot point: some say ‘yea’, others ‘not so’; but the possibility was enough to tempt me. So I bought off the internet – via eBay, where so many of our dreams lead us – a quantity of red Chinese silk. This sat around for a long time in a crystal bowl – so long, in fact, that it began to fade in the light from a rich crimson to a dusky rose pink – then at some stage I decided I ought to do something with it.
Quite how it became such a tangled mess I cannot now remember, but it did:

And that of course meant further delays, and long periods trying to disentangle it, a curiously therapeutic exercise in futility, which at times struck me as a apt metaphor for my existence (and my pursuit of philosophy in particular).
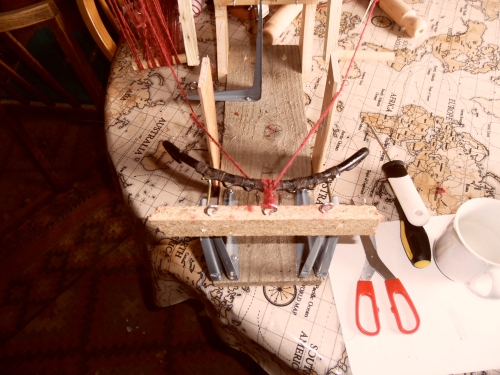
The seed that Susanna Ingram kindly planted in our conversation about yarn winders took some time to germinate, but with the onset of Spring and the stirring of the blood, I decided I really should get round to doing something. So I built a contraption.


This is the first version, though strictly speaking, it is Mk II, since it incorporates the jig I used previously. It has, I would allow, more than a touch of the Heath-Robinson about it: note the use of jam-jar lids, a brass olive and quantities of dowelling rod; though what appears to be a toilet-roll holder is actually two towel-rail supports and a bit metal tube sawn from a left-over part of our spiral staircase. The advantage it offers is that the yarn winders, with pegs placed (more by luck than calculation, I confess) at 9″ centres, will take a yard of silk at every turn.The winders, by the way, though connected by a common axle, rotate independently.
To make things easier still, I had decided to opt for the second method of weaving, which is to start in the middle and work towards each end in turn, so halving the total length of yarn that needs to be handled.
This decision had been rather forced on me, as I was not sure quite how much silk I had managed to disentangle – I reckoned the right-hand rolling pin below probably had enough for half a saddle, roughly reckoned at 25 yards,

and in fact I wound on about thirty turns before taking the momentous decision to cut it off.
I had decided that there was no point in making a fetish of the notion that the saddle must be woven of a single thread throughout: I reckoned that a reef knot or two would not be too obvious, particularly as my neglect of the silk had allowed it to become somewhat hairy and ragged anyway.
Before I started, I brought the cantle up to its proper angle by securing it with fine brass wire (saved from a bottle of Rioja, if you must know – these things do come in handy eventually, provided you live long enough):

This is the method suggested by Sue Hodghton in the Dursley Pedersen workbook, a compilation of miscellaneous jottings by various Pedersen owners, available to members of the Veteran Cycle Club. The idea is that the wires will keep the cantle in place till there are sufficient warp threads strung to do the job; they can then be removed.
Just how laborious the task is, even with yarn winders, can be seen from the pictures below. In the first, the two threads in the foreground are the first and second warps – the upper one will eventually run over the top of the nose-bobbin – seen in the middle of the picture, at the top of the grey bracket – while the lower one will run back from the bobbin to the cantle; but in the meantime, the thread is divided between the two winders: the line in the top left corner has already passed round the cantle and through the loop, and is being wound onto the left-hand-winder; the thread that is, effectively, the slack between warp 1 and warp 2 is wound on the right hand winder; the second picture gives the overall view:


by the look of things, there is about nine yards of silk still on the right-hand winder; it is worth saying at this point that while it is being wound on to the left-hand winder, it is being lifted off the right hand one, as the top warp thread remains in tension. If you are experienced in these matters, you might notice that I have stored up trouble for myself, so that the brief joy of lifting off the final turn to transfer it to the nose-bobbin was short-lived:


here we see the first two warp threads in place, a process that took an inordinately long time. But observe the run of thread on that left-hand winder, and think it through as I had failed to do at this point. Where is the end of the thread, that I need to feed back round the cantle and forward to begin the third and fourth warps? Yes, it is on the inside, at the right-hand edge of winder, nearest the hub, with all the rest of the thread outside it; so it cannot be lifted off easily a turn at a time as was the case before, because the incoming thread (now in tension, remember) will be in the way. And while you are trying to find the best way round that thread, you need to remember that damn’ bit of near-invisible brass wire you used to hold the cantle level – you don’t want to get on the wrong side of that, do you?


To be perfectly honest, I cannot actually remember what I did next. It is evident from the next picture that I must have started again, probably after a profound bout of cursing – note that the two warp threads running to the nose-bobbin have disappeared. I have added two side panels which seem to have some function in keeping the runs of thread separate and ensuring they pass above the brass wire stays (if you look closely you can see they have eyelets fitted, though I did have the good sense to open them out so the thread could be removed through the side if need be).

(and yes, the side bars are made from a broken IKEA sofa-bed slat – what of it?)
and I have also fitted an eyelet to the outside end of one of the pegs, to remind me to start with the end of the thread on the outside and wind in towards the hub:

And in a further frenzy of eyelet-fitting (I must have found a packet of them) I have attached three to the top of the bar behind the cantle plate, with the thread now passing through the middle one:
This was a first attempt solve another problem that was becoming evident – as my late brother Brendan would have been able to tell me (he being a master mariner) a line looped round a slender bar tends to tighten on itself rather than flow freely, so passing the warp round the cantle twice and attempting to wind it on to the second winder was proving difficult. The notion with the eyelets was to keep the line from tightening on the cantle by maintaining a larger loop by passing it through the eyelet as well (I reckoned I would need to shift the eyelets as I progressed along the cantle, hence the other two), but in practice it did not work.
By now Easter was approaching, so I abandoned the attempt for the present, to attend to the Triduum and the great feast that follows. We went to my sister’s in Linlithgow for a very pleasant paschal feast with numerous family members ranging in age from 1/2 (my great-nephew Hamish) to 94 (my mother) and all ages in between. I went for a walk and took a picture of a hedge on the canal towpath that reminded me of a line from Eliot:

‘If you came this way in may time, you would find the hedges
White again, in May, with voluptuary sweetness.’
(I know it was only April, but all the same)
This break from action, begun in frustration at my initial failure to progress (after many hours of painful effort – one thing I was completely unprepared for was the aches and muscle knots engendered in my shoulders and arms by the small but constantly repeated lateral movements from one winder to another) proved to be a time of valuable reflection.
What I would call my practical imagination is underdeveloped: beyond a certain point, I cannot envisage how things will work without actually making them; then I generally learn a lot, usually because they fail, through some fault I have overlooked. The trick is to see that this first unsuccessful effort is not wasted: for me, it is a necessary (if cumbersome) means to improve my understanding.
Among the things I realised was that having the two winders side by side at one end was a needless complication – it would make far more sense to have them in a fore-and-aft arrangement, one behind the cantle plate, the other forward of the nose bobbin. This would be better all round, since it puts them where they actually do their work, and clarifies what that work is. That they turn is secondary: their main function is to absorb the slack between one warp and another; how they do it is immaterial.
I realised also that the mental notion I had of the whole process was mistaken. Misled perhaps by the idea of using a continuous thread and rotating winders, I had been thinking of it as a continuous process whereby the thread was wound back and forth between the winders, passing through the saddle on the way; in fact it is better conceived as a repeated cycle, where the forward top warp runs from the cantle to the nose-bobbin, the slack is taken up at the front, then the lower return warp runs back to the cantle and the slack is taken up at the rear. Each cycle ends with a pair of warps in place and all the remaining thread wound on the after winder.
Each fresh cycle starts with a double turn about the cantle-iron, but it is important to see that as a separate action, nothing to do with the winders and requiring a separate tool to facilitate it; what I hit upon was the simple expedient of a rod – another length of dowel – which would double the cantle-iron for most of the passage of the forward warp, which would begin by being wrapped around the cantle and the dowel; only at the very end, when all the slack had been transferred to the forward winder and the warp was to be drawn tight, would the rod be slipped out and the thread left to tighten about the cantle iron.
Passing the warp forward involves lifting a turn from the rear winder (which remains stationary to maintain the tension in the return warp till it is transferred to the cantle-iron) and feeding it around the cantle & rod by winding it onto the forward winder, at the same time easing the rod back and forward to keep the double loop open and allow the thread to flow. The technique is demonstrated below – here we are close to the point where the rod can be removed and the thread tightened round the cantle-iron:

(Another improvement that can be seen here is the supports for the ends of the cantle iron, which did away with the need for that troublesome wire stay on either side. The iron rests on them at the appropriate height, but being still attached by hooks to the back bar, can be lifted clear if need be.)
One of the things that revived my energies and renewed my impetus was an idea I had for attaching the winders in their new fore-and-aft arrangement, which at the time I thought very clever (I still rather like it, though like many ‘clever’ ideas, it proved less brilliant in practice – but still, it moved me on, and that was its real benefit). It struck me that I might attach the winders to ratchet drives, of the sort that are used for spanners with interchangeable sockets. I knew these could be had cheap (I had seen them in the pound shop, though typically when I went to look, they had none – but I sourced a couple of cheap ones elsewhere) and they offered several advantages, to my mind: the winders could be made easily demountable (I envisaged a socket head attached to the centre of the winder, the ratchet drive mounted on an upright) and the ratchet function would allow them to wind in either direction as needed, but also to be held steady when that was required.
My desire to make all the components recyclable engendered a somewhat over-elaborate mode of fixing: I ran a bolt through the centre of the winder hub (formed from a jam-jar lid) and secured it with a nut, which was to have a double office, since I could use it to locate the socket, which in turn would slot onto the ratchet drive. And to hold the socket to the nut? Why, a mini-magnet, of course!
I might have been better to stick to my original plan of two larger disc magnets fitted neatly into the 10mm sockets, but I allowed the man in Maplin’s to seduce me into buying a pack of twelve mini magnets (because of course you never know when you might need one, and they cost the same). These were actually packaged as a scientific toy, which provided some diversion when I got home – below you can see a small square of graphite: in the first picture, it is resting on the left of the metal plate, beside the array of mini-magnets; in the second, it appears to be resting on the bed of magnets, but is actually hovering above them, the same principle that operates a mag-lev train. How cool is that? – well, I thought it was, a bit:


In practice, I found that I needed to thread more than one nut on the bolt (because of the depth of the socket) and the fit of nut in socket was a bit loose, so the whole arrangement was rather shoogly, but it was fun. Here we see the Mk III saddle-weaving jig, with winder-mounts on pillars fore and aft incorporating ratchet-drives held in place by ice-lolly sticks (knew they’d come in handy too, eventually – all those magnums we’ve eaten):


Note a further refinement, that the bracket for the nose-bobbin has been turned through 90 degrees and mounted on a pad that can be slid between rails, to allow it to be secured in a range of positions – this allows the starting length of the saddle to be varied, and should also give a means of increasing the tension if needed. (I’m obviously getting a bit grandiose, now – what started as a one-off jig has become a means of batch production).
The following sequence gives an idea of the Mk III jig in action. The first picture shows the new starting position, with one end of the thread anchored to the base; this, in due course, will be tied to the silk to be used for weaving the second half of the saddle. If you were determined to use a single continuous thread, you could instead have the other 25 yards wound on something (like a wooden rolling pin) and set aside. The entirety of the thread has been wound onto the fore winder, as seen in the second picture; note that there has been no need to use the dowel rod at this point, as the first double turn about the cantle can be made before anchoring the spare end to the base.


Now we can run the second, return warp back to the rear winder – starting, of course, on the outside and working in. Note that at this point the return warp does not need to go near the jig – in effect, it has not reached it yet; only when all the thread is wound on, and the loop of warp at the other end is transferred to the nose bobbin and pulled tight do we need to concern ourselves with feeding the end of the thread through the spring loop –


– and though, of course, it passes over the top of the bracket to which the cantle is hooked (and an improvement might be to blank off the space below the bar and between the grey brackets to prevent any possibility of passing underneath) the thread enters the spring loop itself from below, as it is the bottom or return warp; it is then turned twice about the cantle, and, temporarily, the dowel rod;

I found that the easiest mode of operation was to hold the dowel rod in the left hand and move it accordingly as I was either gathering the feed from the aft winder (from which the thread was lifted a loop at a time, the winder remaining stationary) or else winding it on (with my right hand) to the fore winder. In the first picture below, almost all the thread has been wound forward; now the rod can be removed and the thread tightened about the cantle, as seen in the second picture:


I will not pretend that this was a speedy process, and the half-finished warp below represents many hours’ work, though in retrospect it could have been quicker – I persisted in using the winders even after I was clear of the spring loops – the only stage they are actually needed for. I could simply have stored all the spare thread on a single winder, detached it, and held it in one hand while I used the other to wind only as much thread as I needed about the cantle plate and the nose-bobbin.

Even using the winders throughout, one advantage of starting at the middle is that the amount to be wound lessens with every pair of warps, so that you have a sense of the end approaching to spur you to the finish; going in the other direction, with a continuous thread, you would still have half of it on the winders when you reached the mid-point.
As I suggested above, my ingenious notion of using ratchet drives proved less clever in practice, for several reasons – the fit was loose at best, with a lot of play between the various components, so that the winder tended to lean over at an angle; and rotation could make the socket act as a spanner (which it was, after all) and undo the bolt that secured the winder, so that from time to time the whole thing would fall off, accompanied by much bad language. I toyed with various ways of correcting this, till it struck me that the simplest was to turn the winders from vertical to horizontal, so that gravity would help keep them in place instead of making them lean over and fall:
.

The arrangement was very much a makeshift – (a timenoguy, indeed, Susanna!) and the ratchet drive was actually bound to the top of the post with the discarded brass wire from earlier, which later had to be supplemented with string, as the strain of operation began to tell on the glue that held the lolly-sticks. By that time I was determined to finish the thing, come hell or high water, and it has to be said the contraption finished in a fairly ramshackle state of fallingapartness. If (when!) I redesign it, I think I will retain my beloved ratchet drives, but incorporate them in the winder-hubs and put the socket on top of the pillars.
I did think that, with the warp completed, the hard work was done, but I was mistaken. Though the weft or cross-threads are relatively few – ranging from 9 to 17 on a sample of original saddles cited by Sue Hodghton in the Dursley-Pedersen workbook – I found weaving them as difficult and frustrating a part of the process as any. This was owing to the difficulty in distinguishing the upper and lower warps – the weft passes over the upper and under the lower, so that when it is tightened, one is pulled down and the other up, creating the weave. The trouble was that my choice of silk was unwise; I should have gone for something with a more definite ‘twine’ so that its edges were sharply defined. To make matters worse, my neglect of the silk in allowing it to become tangled had rendered it hairy and ragged, so that where the the warps ran close (as they do especially at the edges) the space between them was blurred. In the end I was just shoving the needle through a mass of warps and wiggling its tip about in the hope of finding something like the right path, and I abandoned the attempt as soon as I decently could, with a new record low for a Pederesen saddle of about six (possibly seven) wefts. It was not a satisfactory thing, as the picture of the finished article shows:

Another point worth noting is that the tension is somewhat uneven – note the lumpiness towards the upper edge in the picture – and that the saddle is actually rather short, despite my initial determination to make it longer than the 11 5/8″ recommended by Sue Hodghton in the DP workbook. Both faults have a common cause: in setting up my ingenious ‘sliding foot’ arrangement for the nose-bobbin support, I had only secured it to the board by a single screw, at the end of the bracket nearest the rear of the jig. I had failed to hoist in the considerable force exerted by the warp threads as they are run to and fro, which grows as they multiply; at some point they had begun to lift the other end of the foot clear of the board, so effectively shortening the saddle, and throwing the overall tension out. So any future arrangement should I think be secured at several points, and certainly at the bobbin-end of the foot.
My friend Susanna Ingram has since pointed me in the direction of the heddle-stick (the vocabulary of weaving is a delight in itself) as illustrated on the Andean backstrap loom here, and I think some variant of that, together with a better choice of thread, would go a long way to solving my problems with the weft.
But, hey! it worked!
Here it is in action, on its very first trip, to fetch a Stornoway Black Pudding from the Brig Farm shop over the hill in Strathearn:


It was a dreich day, as we say in these parts,

and the crops in the fields glowed a sinister day-glo yellow,

but what did I care as I sped along?

I was back in the hammock saddle


and seated on silk


* The Madonna of the Yarnwinder – whom I now acclaim patron saint of saddle-weavers – aka The Buccleuch Madonna – was a great favourite of my youth, when I was at Edinburgh University and it was in the Scottish National Gallery on the Mound; it has had some adventures since then, I believe, including having been stolen for a time from Drumlanrig Castle, the Duke of Buccleuch’s ancestral home. Sadly the picture here does not accurately reproduce the arresting blue-green shade of the background, which drew the eye as soon as you saw it, even from the other side of the room where it hung.
